
The OSINT Newsletter - Issue #115
OSINT Tool Tuesday: Leaker

👋 Welcome to OSINT Tool Tuesday. This week we're looking at Leaker; a command-line tool that aggregates searches across numerous public breach and leak intelligence sources from a single interface. Instead of manually querying multiple databases one at a time, Leaker allows you to search for email addresses, usernames, domains, phone numbers and keywords using one command, returning consolidated results from whichever sources you choose to query.
🚨 This tool has been added to the OSINT Resources for Breached Data Provider OSINT page on The OSINT Newsletter for easy reference later. That list serves as a roadmap for new tutorials in the future. If there are any tools you’d like to see added to the list and covered, please reach out to jake@osint.news with details.
🪃 If you missed the last newsletter, here’s a link to catch up.
⚡ Reply Guys & Power Users: OSINT on Forums and Online Communities

🎙️ If you prefer to listen, here’s a link to the podcast instead.

Let’s get started. ⬇️
Leaker
Leaker is a passive leak enumeration tool that queries 12 different breach databases simultaneously and consolidates the results with a single command. It supports five search types: email addresses, usernames, domain names, keywords, and phone numbers. Results may include exposed emails, usernames, passwords, password hashes, IP addresses, phone numbers, names, database sources, and associated URLs depending on what each source returns.
🎩 H/T: @vflame6 / Maksim Radaev
Leaker is best suited for users who already have API access to breach data providers and want to streamline their workflow.
Note: It doesn’t provide its own breach data; it aggregates results from third-party sources.
In this guide, I’ll show you how to install Leaker, perform your first searches, work with multiple sources and use it effectively during OSINT investigations.
So, without further ado, let’s get started. ⬇️
Setup
Leaker runs entirely from the command line but the installation is one of the most straightforward I’ve seen.
All you need to do, using Go, is to paste the below into your terminal:
go install -v github.com/vflame6/leaker@latest
Once installed, it’s worth checking everything is working correctly by inputting this command:
leaker --version
Your main sticking point with this tool is the need to configure your API keys to access results via multiple sources as only 2 sources (Hudson Rock and Proxy Nova) don’t require you to have them.
To configure your API keys, edit the provider config file at `$HOME/.config/leaker/provider-config.yaml` (auto-generated on first run):
Yaml
leakcheck: YOUR_API_KEY
dehashed: YOUR_API_KEY
Snusbase: YOUR_API_KEY
You can view the list of available sources here:
Usage
Leaker organises searches by the type of identifier you’re investigating.
Email Searches
Email addresses are probably the most common starting point during breach investigations. This is the format you’ll what to input into the command line:
leaker email person@example.com
Leaker will query its configured sources and return any matching records that are discovered.
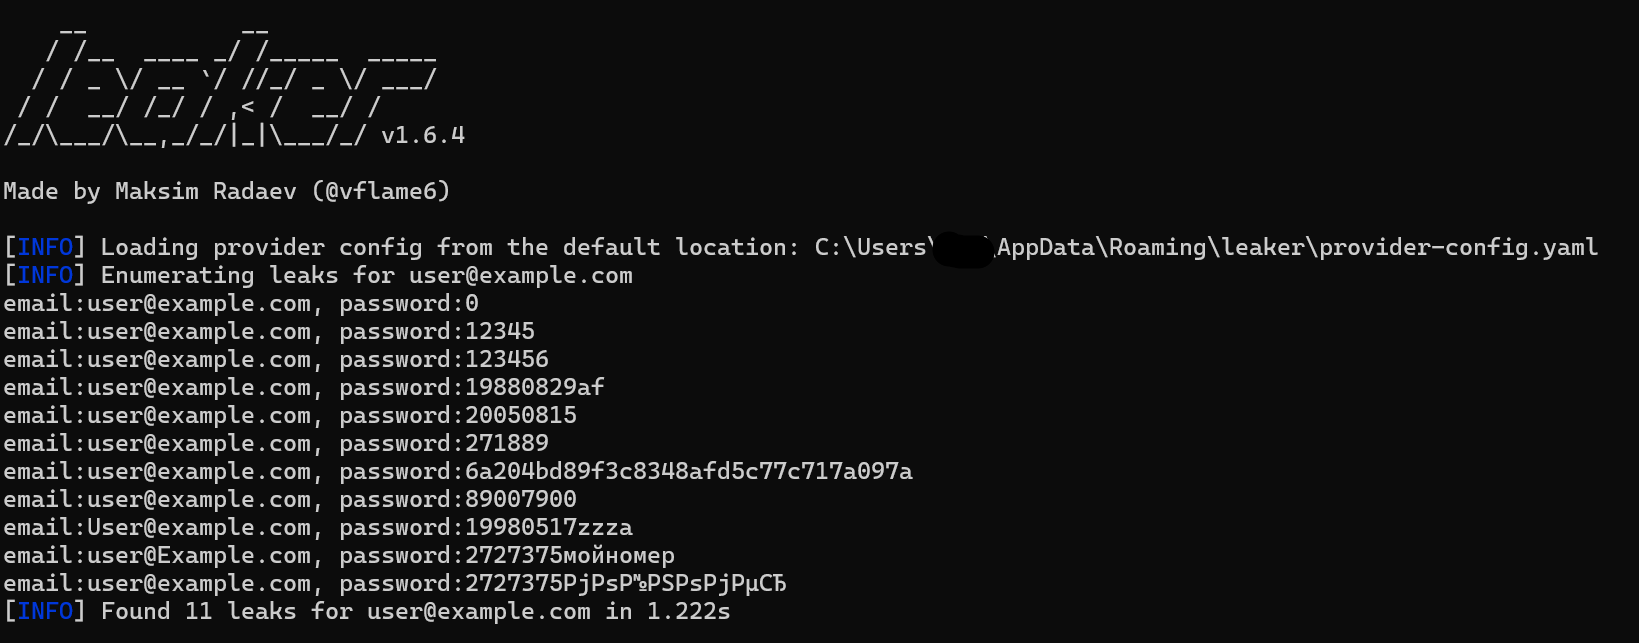
🗒️ This is usually the quickest way to establish whether an email address appears in known breach datasets.
Username Searches
Usernames often appear across multiple breaches and services. The below is the example command:
leaker username johnsmith

Such searches can reveal associated datasets helping you build a timeline of historical exposure.
Domain Searches
You can search entire domains, which can prove useful in corporate investigations. The format you’d input is as below:
leaker domain example.com
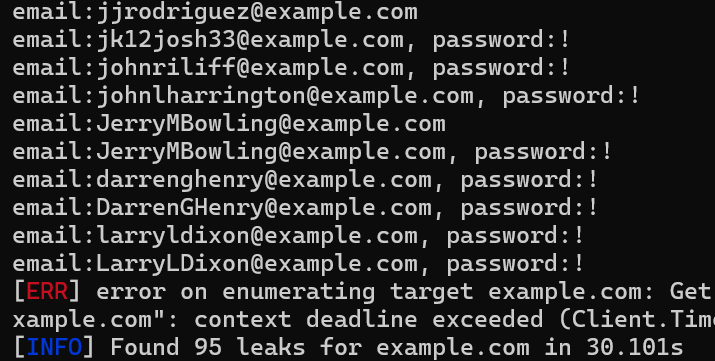
This helps identify breached accounts associated with an organisation and can support attack surface assessments or incident response activities.
Phone Number Searches
Where supported by the selected sources, Leaker can also search telephone numbers. Again, the format to enter into your command line would simply be as below:
leaker phone +441234567890
This can provide another useful pivot during identity-focused investigations.
Keyword Searches
Leaker isn’t just limited to identities; you can search for keywords too by entering a similar command to the below:
leaker keyword osint
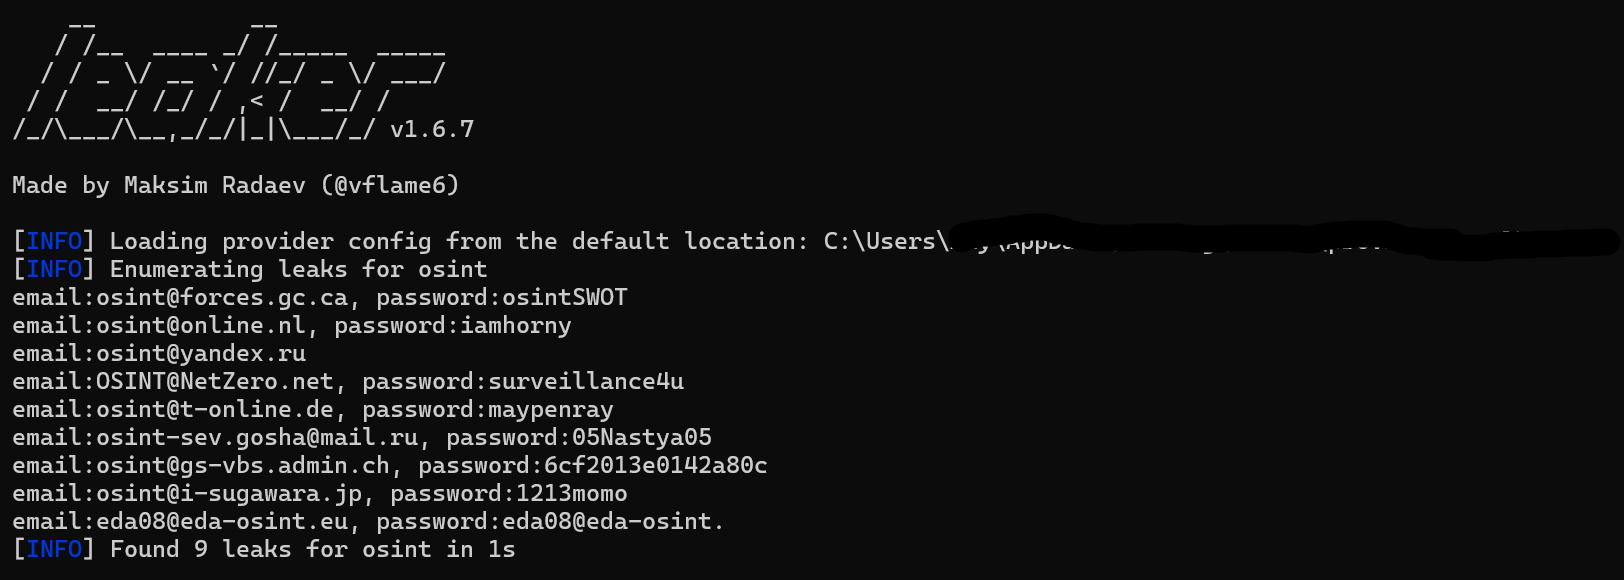
This can surface references to organisations, projects or other terms across supported leak sources.
Working With Multiple Targets
One feature that makes Leaker particularly useful is its ability to process lists rather than individual searches.
For example, if you have a text file containing one email address per line:
leaker email emails.txt
The same approach works for usernames, domains and phone numbers, making Leaker ideal when triaging larger datasets or conducting exposure reviews.
Selecting Sources
By default, Leaker queries its standard online providers, but you can also specify exactly which sources to use or even search a local cache database.
To quickly view the available providers at any given time:
leaker --list-sources
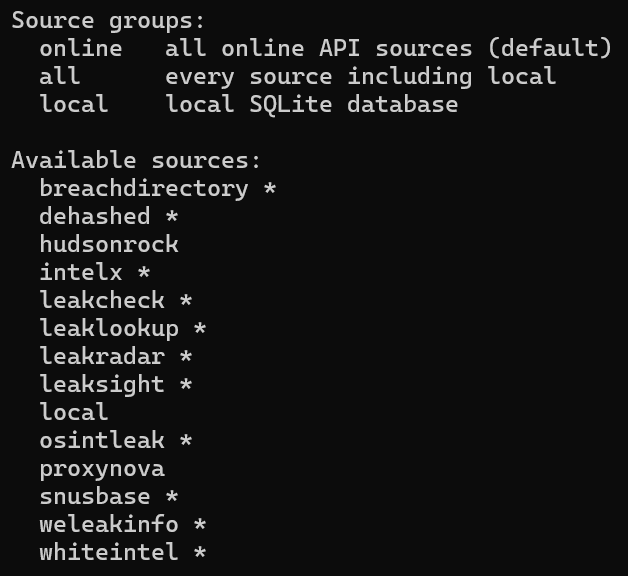
You can then select individual sources using the -s option, helping reduce unnecessary queries or focus on a particular provider.
JSON Output
If you’re integrating Leaker into scripts or larger workflows, JSON output is extremely useful. You can enter the following command:
leaker email user@example.com -j
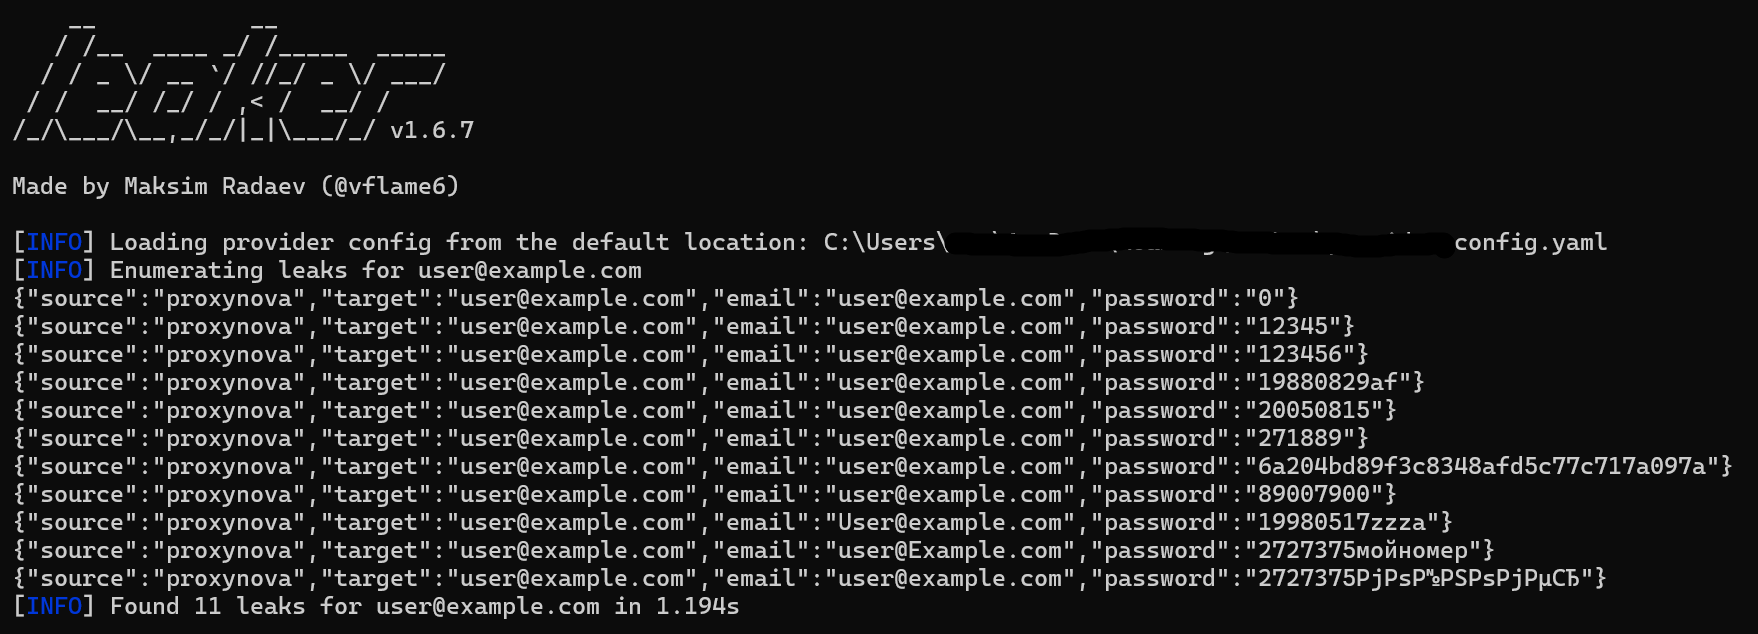
This produces JSONL output that can easily be piped into jq, Python scripts or other automation tools.
Use Cases
Leaker’s main strength is its ability to consolidate results from numerous data sources into one search, making it easier to identify exposed information, correlate identities, and investigate historical data breaches. It fits naturally into a number of OSINT workflows. So, let’s explore those further:
Credential Exposure Discovery
This is arguably the primary use case, as Leaker enables investigators to determine whether email addresses, usernames, domains, phone numbers, or keywords appear in known breach datasets. The results can reveal exposed credentials, password hashes, contact details, and other compromised information, making the tool valuable for breach investigations, identity exposure assessments, and security awareness activities.
Threat Intelligence
Leaker can enrich investigations by identifying compromised accounts linked to threat actors, uncovering infrastructure associated with breached data, correlating aliases across multiple datasets, and identifying additional indicators that may support ongoing investigations. Historical breach data often provides useful context when tracking cybercriminal activity or attribution.
Identity & Persona Research
As Leaker can be leveraged to correlate usernames, email addresses, phone numbers, and other identifiers across multiple breach datasets, this can help build profiles, identify alternate accounts or aliases, establish relationships between digital identities, and support investigations into online personas using historical exposure data.
Corporate Security Assessments
Security teams can use Leaker to identify whether employees, corporate email domains, or organisational assets appear in publicly available breach datasets. This supports external exposure assessments, credential hygiene reviews, incident response investigations, third-party risk assessments, and attack surface management by highlighting credentials or information that may already be available to attackers.
Incident Response & Breach Investigations
During incident response, Leaker can help investigators quickly determine whether compromised accounts or identifiers have previously appeared in known breaches. Understanding historical exposure can provide valuable context, assist with scoping investigations, and help determine whether reused credentials or previously compromised accounts may have contributed to an incident.
Important Note: The presence of data in breach repositories does not necessarily indicate a current compromise so results should always be independently verified.
OPSEC Considerations
Remember that Leaker queries publicly available breach intelligence providers, it doesn’t magically uncover private information.
Always:
Follow the terms of the services you’re querying.
Never attempt to access accounts discovered during an investigation.
Handle breach data responsibly.
Ensure your investigations remain lawful and proportionate.
Additional Tips
Here are a few ways to get more from Leaker:
Use JSON output when automating workflows.
Cache results locally to reduce repeated lookups.
List available providers before large investigations.
Use information discovered in one search to perform additional lookups. For example, a username may reveal an email address, which in turn may expose additional usernames, domains, or phone numbers that were not initially known.
Use Keywords Strategically. Broad searches may return large result sets so refining keywords often produces more relevant results.
Combine Leaker with tools such as Holehe, Sherlock or Have I Been Pwned for broader identity profiling.
Here are a few ways to get more from Leaker:
Use JSON output when automating workflows.
Cache results locally to reduce repeated lookups.
List available providers before large investigations.
Use information discovered in one search to perform additional lookups. For example, a username may reveal an email address, which in turn may expose additional usernames, domains, or phone numbers that were not initially known.
Use Keywords Strategically. Broad searches may return large result sets so refining keywords often produces more relevant results.
Combine Leaker with tools such as Holehe, Sherlock or Have I Been Pwned for broader identity profiling.
🏁 New CTF Challenge Live - Secret File
A new CTF challenge has been posted on our CTF website. This week’s challenge involves a recovered secret file that appears to hide a location. Your objective is to uncover the hidden coordinates and identify the name of a nearby bar.
Start competing in our Capture the Flag (CTF)
🪃 If you missed the last CTF, here’s a link to catch up.
Last week’s CTF challenge featured a challenge titled “Port Recon” where participants were tasked with identifying the country where a webcam was located, as well as the names of the six cruise ships docked at the port.
Challenge solution WU :
To solve this challenge, participants need to perform a reverse image search on the provided image. This search leads to an Instagram post showing the same port, where the location is identified as Corfu.
A simple web search for Corfu reveals that the port is located in Greece. Although the Instagram post is written in Greek, the location information is enough to identify the country.
By examining the same Instagram post, participants can also find the names of the six cruise ships present in the port, allowing them to complete the challenge.
✅ That’s it for the free version of The OSINT Newsletter. Consider upgrading to a paid subscription to support this publication and independent research.
By upgrading to paid, you’ll get access to the following:
👀 All paid posts in the archive. Go back and see what you’ve missed!
🚀 If you don’t have a paid subscription already, don’t worry. There’s a 7-day free trial. If you like what you’re reading, upgrade your subscription. If you can’t, I totally understand. Be on the lookout for promotions throughout the year.
🚨 The OSINT Newsletter offers a free premium subscription to all members of law enforcement. To upgrade your subscription, please reach out to LEA@osint.news from your official law enforcement email address.